Quick Reference Guide…
If you are in labour, please use the quick reference guide set out below. It is however recommended that you read this entire guide in particular “Setting Up Your Elle TENS” to obtain the best performance from your unit.
![]() Before using the Elle TENS 2, please read the contraindications and warnings further down.
Before using the Elle TENS 2, please read the contraindications and warnings further down.
- Ensure the Elle Tens 2 unit is switched off
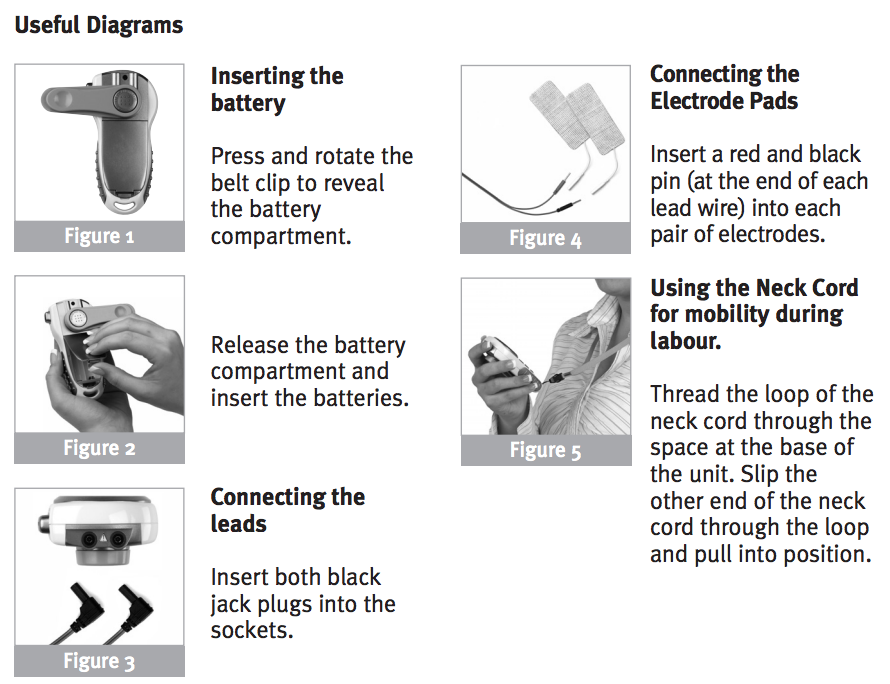
- Insert 2 x AA batteries in the compartment at the back of the unit (see figures 1 and 2).
- Insert the leadwire plugs into the top of the unit (see figure 3).
- Insert the pins at the other end of the leadwires into the sockets attached to the electrode pads. Do not remove the electrodes from their backing at this stage (see figure 4)
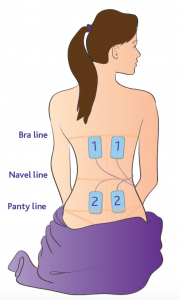
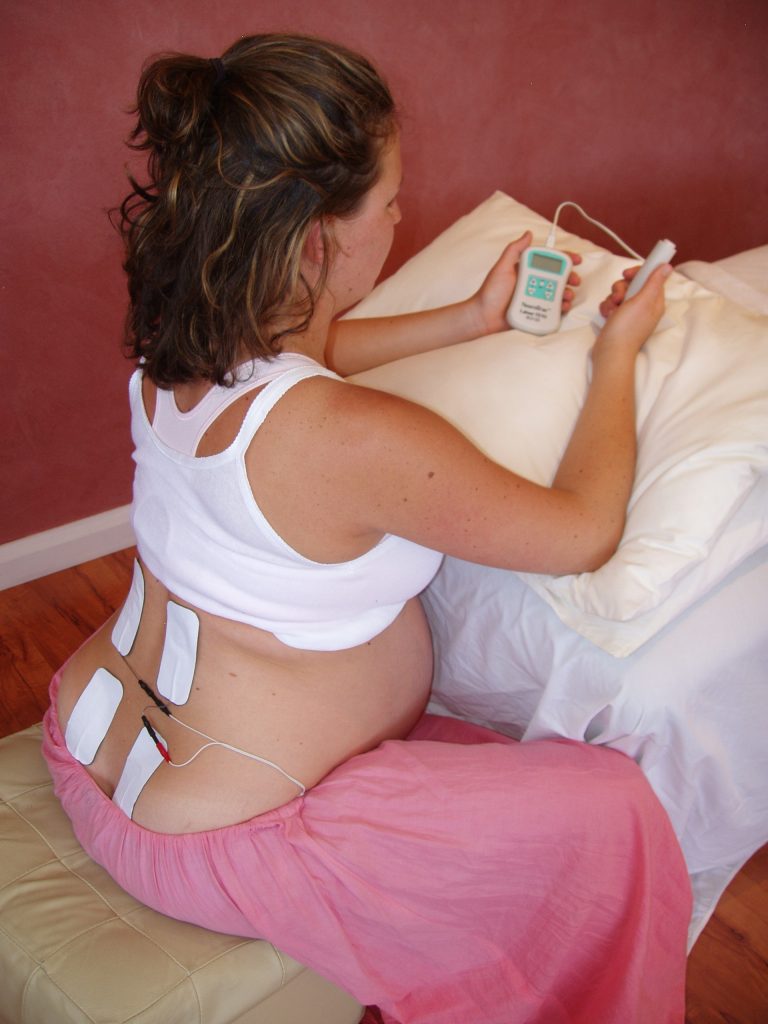
- Position the electrode pads on the body as indicated in picture 2 below. A pair of electrodes must be connected to each lead wire in order for you to feel any sensation. The electrode pads must be peeled away from their backing and placed directly on your body for you to feel any sensation.
- Make sure that the ‘boost’ button at the side of the unit is NOT pressed in. This ensures that the unit will start in the BURST 1 mode (see picture 1).
- Press the
 (on/off) to turn the unit on.
 - Now push the
 (CH1 +) key until you feel a pulsating sensation.
 - Repeat the same with the
 (CH2+) key.
 - At the onset of a contraction press the ‘boost’ button for the additional surge of power needed to combat the pain.
- Release the ‘boost’ button once the contraction has passed and continue in the BURST 1 mode as before.
![]() Equipment providing a particular degree of protection against electric shock particularly regarding allowable leakage currents having an F type (floating) applied part.
Equipment providing a particular degree of protection against electric shock particularly regarding allowable leakage currents having an F type (floating) applied part.
 Please keep device away from sprays of water or rain.


![]() Contraindications
Contraindications
- Do NOT use TENS before 37 weeks of pregnancy unless under medical supervision.
- Electrodes should only be positioned as recommended (see picture 2) unless otherwise stated by your midwife or medical adviser.
- Do NOT place electrodes on the abdomen (before birth), the front or side of the neck, or areas on the head, which could cause current to flow transcerebrally.
- Do NOT use TENS if you have a demand-type cardiac pacemaker or any other implanted electrical device.
- If you suffer from epilepsy, heart condition, any undiagnosed pain, or have any metal implants, or any doubts whatsoever consult your midwife.
- Do NOT use if you have an allergic reaction to the electrodes.
- Never use TENS to mask undiagnosed pain since this could require urgent treatment.
![]() Warnings
Warnings
- Electronic monitoring equipment (such as ECG monitors and ECG alarms) may not operate properly when TENS stimulation is in use.
- Skin irritation can occur following long term application.

![]() Power Bar: This shows the output from 0 to 15 for both left and right channels. Each segment represents approximately 7% of the total output.
Power Bar: This shows the output from 0 to 15 for both left and right channels. Each segment represents approximately 7% of the total output.
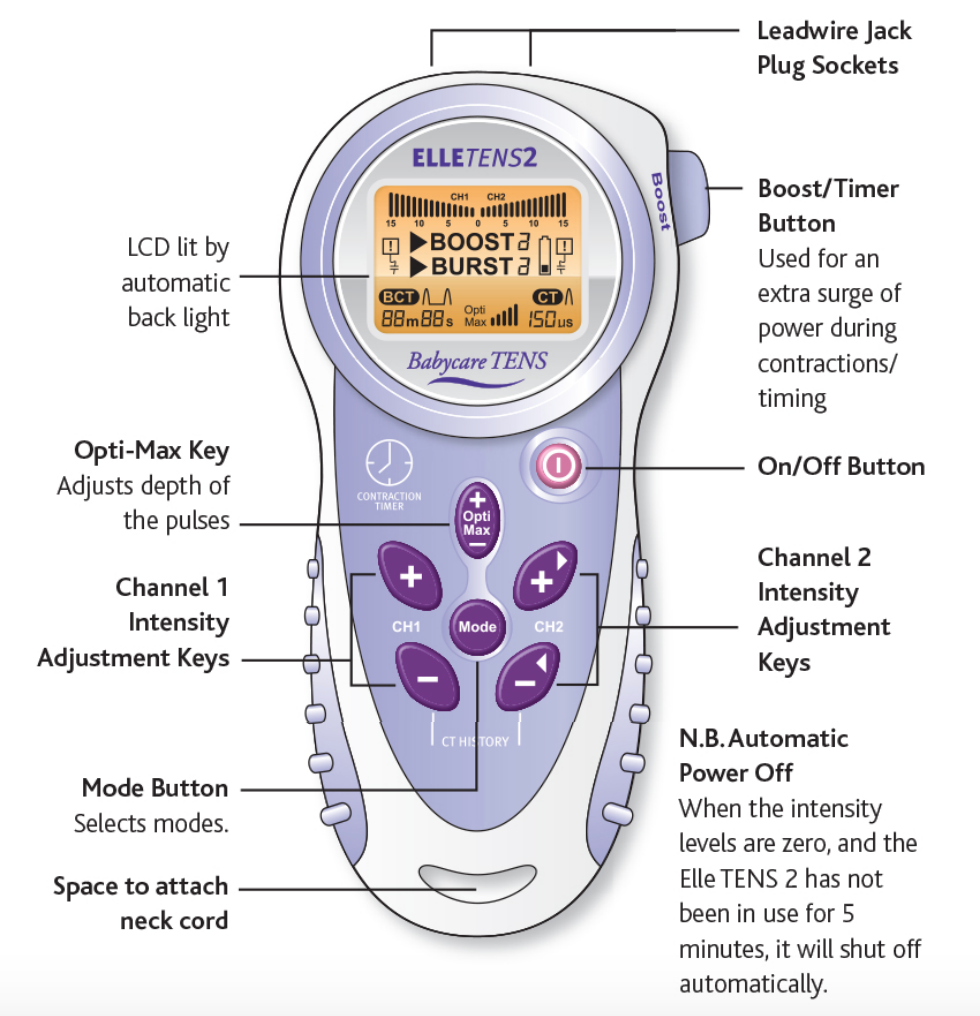
![]() Pressing the ‘Boost’ button at the top right of the unit activates the Boost mode. This function is used during contractions. The small arrow to the left of the word Boost will remain on, indicating the unit is in a continuous mode. There are two Boost modes available indicated by a 1 or 2. You can switch between them by pressing the Mode Button.
Pressing the ‘Boost’ button at the top right of the unit activates the Boost mode. This function is used during contractions. The small arrow to the left of the word Boost will remain on, indicating the unit is in a continuous mode. There are two Boost modes available indicated by a 1 or 2. You can switch between them by pressing the Mode Button.
![]() BURST is used at the onset of labour and in-between contractions. The small arrow to the left of the word Burst will flash in time with the bursting rhythm you feel from the Elle TENS 2. There are two Burst modes available indicated by a 1 or 2. You can switch between them by pressing the Mode Button.
BURST is used at the onset of labour and in-between contractions. The small arrow to the left of the word Burst will flash in time with the bursting rhythm you feel from the Elle TENS 2. There are two Burst modes available indicated by a 1 or 2. You can switch between them by pressing the Mode Button.
 BETWEEN CONTRACTION TIMER starts by pressing the Boost button, this automatically measures the time interval between your contractions.
![]() MODE 1 and 2 – There are two mode ranges available each with a Burst and Boost function. See below for use.
MODE 1 and 2 – There are two mode ranges available each with a Burst and Boost function. See below for use.
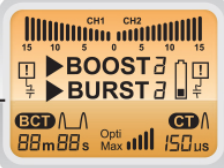
![]() Low Battery Indicator: This sign will start flashing when the batteries are running low. If this is the case, change both batteries. Please refer to #Figures 1-5 for instructions.
Low Battery Indicator: This sign will start flashing when the batteries are running low. If this is the case, change both batteries. Please refer to #Figures 1-5 for instructions.
![]() Opti-max: Indicates the Opti-max output. Each segment represents 20% of total Opti-max power. Please refer to page 8 for more details.
Opti-max: Indicates the Opti-max output. Each segment represents 20% of total Opti-max power. Please refer to page 8 for more details.
 Contraction Timer: Starts by pressing the Boost Button, this automatically records the duration of your contraction.
![]() Pad contact warning: (safety cut out) This symbol will appear if any of your pads are not attached securely to the skin.
Pad contact warning: (safety cut out) This symbol will appear if any of your pads are not attached securely to the skin.

a) You are now ready to start using your Elle TENS 2. Switch the unit on by pressing the ![]() on/off button. Ensure that the ‘boost’ button located at the top right of the unit is NOT pressed in. The Elle TENS 2 will always start up in BURST 1 mode.
on/off button. Ensure that the ‘boost’ button located at the top right of the unit is NOT pressed in. The Elle TENS 2 will always start up in BURST 1 mode.
b) Begin by pressing the ![]() CH1+ key. Each time you press this key, a small ‘half-moon’ shape will appear on the screen increasing in number and size as the intensity is increased. You will begin to feel a pulsating sensation which will burst in time with the small arrow flashing on the screen. Ensure that you increase the intensity slowly.
CH1+ key. Each time you press this key, a small ‘half-moon’ shape will appear on the screen increasing in number and size as the intensity is increased. You will begin to feel a pulsating sensation which will burst in time with the small arrow flashing on the screen. Ensure that you increase the intensity slowly.
c) Repeat the previous step with the ![]() CH2+ key. You will now feel a sensation in both sets of pads.
CH2+ key. You will now feel a sensation in both sets of pads.
Recalling your contraction history
To recall a list of your last 5 ‘Contraction Times’ (CT) and ‘Between Contraction Times’ (BCT) press the ![]() CH1- and CH2- buttons simultaneously. The last recorded set of BCT and CT times are shown as 1.
CH1- and CH2- buttons simultaneously. The last recorded set of BCT and CT times are shown as 1.
Use ![]() CH2+ to go back to previous sets (e.g. 2, 3, 4, 5) or forward again by pressing
CH2+ to go back to previous sets (e.g. 2, 3, 4, 5) or forward again by pressing ![]() CH2- key. Recalling the contraction history will not interrupt the functionality of the unit. N.B. to avoid losing contraction history, do NOT switch the unit off. To return back to the original mode screen, (which will have continued counting in the background), press the
CH2- key. Recalling the contraction history will not interrupt the functionality of the unit. N.B. to avoid losing contraction history, do NOT switch the unit off. To return back to the original mode screen, (which will have continued counting in the background), press the ![]() CH1- and CH2- buttons together again.
CH1- and CH2- buttons together again.
The Mode Button
There are two mode ranges available on the Elle TENS 2, each with a Burst and Boost function.
Mode 1 (Burst 1 and Boost 1), which has been described above, is primarily used for the earlier stages of labour.
Mode 2 (Burst 2 and Boost 2) can be used when your labour advances and your contractions become more frequent.
Press the ![]() Mode button to switch between modes. You will see from the User Display, that the number on the centre right of the display will change from 1 to 2 (and vice-versa).
Mode button to switch between modes. You will see from the User Display, that the number on the centre right of the display will change from 1 to 2 (and vice-versa).
NB. Both modes are interchangeable and can be used according to your preference, not necessarily for the stage of labour you are in.
The Opti-max Key
This provides extra versatility to your Elle TENS 2. Increasing or decreasing the Optimax key will allow you to either heighten or lessen the level of pulse power transmitted to the electrode pads.
Pressing the ![]() OM key either + or – will increase or decrease Opti-max sensation, this is extremely useful for the final stages of labour when you need an extra surge of power.
OM key either + or – will increase or decrease Opti-max sensation, this is extremely useful for the final stages of labour when you need an extra surge of power.
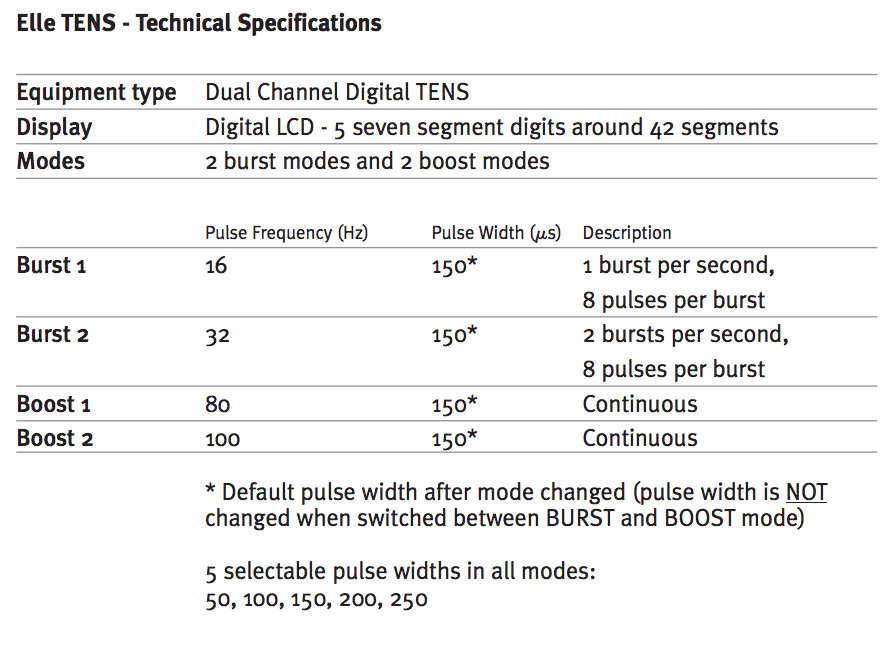
There are 5 Opti-max levels: 50, 100, 150, 200, and 250μs microseconds. The unit will always start up at Opti-Max 150μs, which is exactly half way between the highest and lowest setting.
NB. The Opti-max key can be used according to your preference and not necessarily for the stage of labour you are in. The Elle TENS 2 starts up in BURST 1. The BCT only appears after one cycle of pressing the Boost button on and off.